The Big Picture
The dealer wanted $280 to install a hardwire kit for my dashcam's parking mode. That's a 30-minute job with a $15 add-a-fuse and a $10 ground ring terminal. I've seen them charge $120 for just the 'diagnosis' when the customer's battery died from a cheap USB power adapter. Absolute daylight robbery for basic 12V circuit work. Auto Roamer calls it a '24/7 surveillance system', which is a fancy way of saying it doesn't shut off with the ignition.
Parking mode isn't some black magic. It's a camera that stays hot after you kill the engine, watching for mechanical stress or visual changes. Your typical dashcam's 12V car charger is for temporary use. For actual protection, you need a proper power solution. This means hardwiring.
Hardwiring connects your dashcam directly to your vehicle's electrical system. This provides reliable, always-available power for both driving and parking mode recording. No more loose connections or faulty adapters dropping power when you need it most. A quality hardwire kit is about reliability, not just convenience.
People always ask if parking mode will kill their car battery. The short answer: not if it's set up right. The long answer involves parasitic draw calculations and cutoff voltages. Your typical 60Ah lead-acid battery has about 30Ah usable before starting issues.
Without a proper hardwire kit, your dashcam will pull constant power until the battery voltage drops too low to crank the starter. This can happen in as little as 12 hours with a high-draw camera. The dealer won't tell you this; they'll just sell you a new battery.
I've seen too many dead batteries from cheap USB power adapters. Those things don't have voltage cutoffs, just a constant pull. A proper hardwire kit manages that parasitic draw, shutting off the camera before your engine is stranded. It's about preserving circuit integrity and vehicle function.
Key Features to Consider
When I'm spec'ing out a hardwire kit, I'm looking at specific failure modes and voltage tolerances. Forget the marketing fluff. Here's what actually matters:
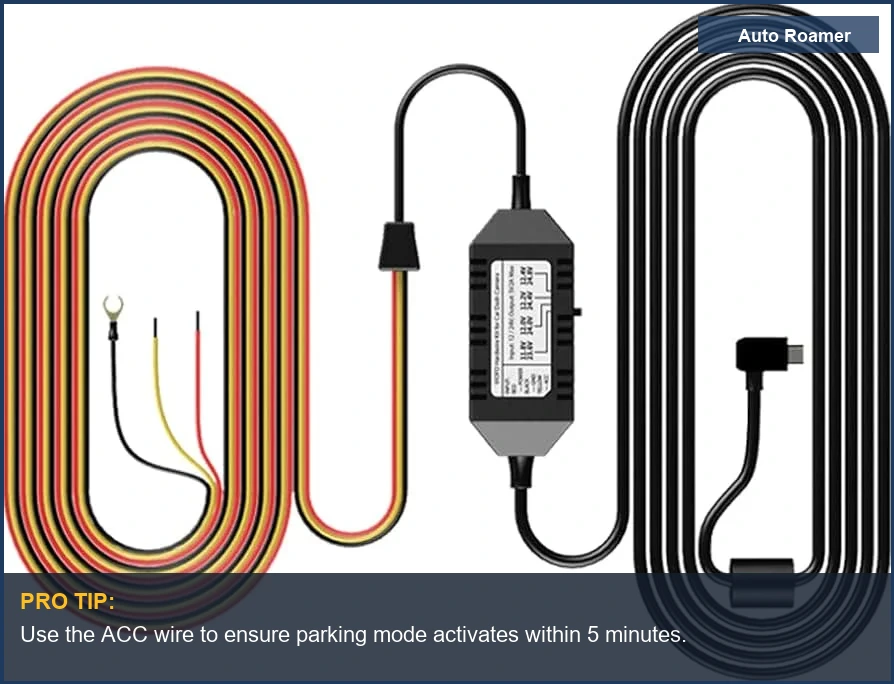
Most kits include a fuse tap, which is basically an add-a-fuse. This lets you tap into an existing fuse slot. You need to pick a circuit that's 'always on' for parking mode, and one that's 'switched' for driving mode. Don't just pick any fuse; check your vehicle's manual for proper fuse function.
| Feature | Why it matters (Dirtbag Engineer's take) |
|---|---|
| Voltage Cutoff Protection | Prevents deep discharge. A 12V lead-acid battery is effectively dead below 11.8V. Most kits offer 12.0V or 12.2V cutoffs. This protects your cranking amps. Without it, your battery's internal resistance increases, reducing its capacity. |
| Timer Cutoff | Limits parking mode duration. If your car sits for days, even a low parasitic draw will kill the battery. A 24-hour timer prevents this. It's a mechanical stress reducer on your battery's charge cycles. |
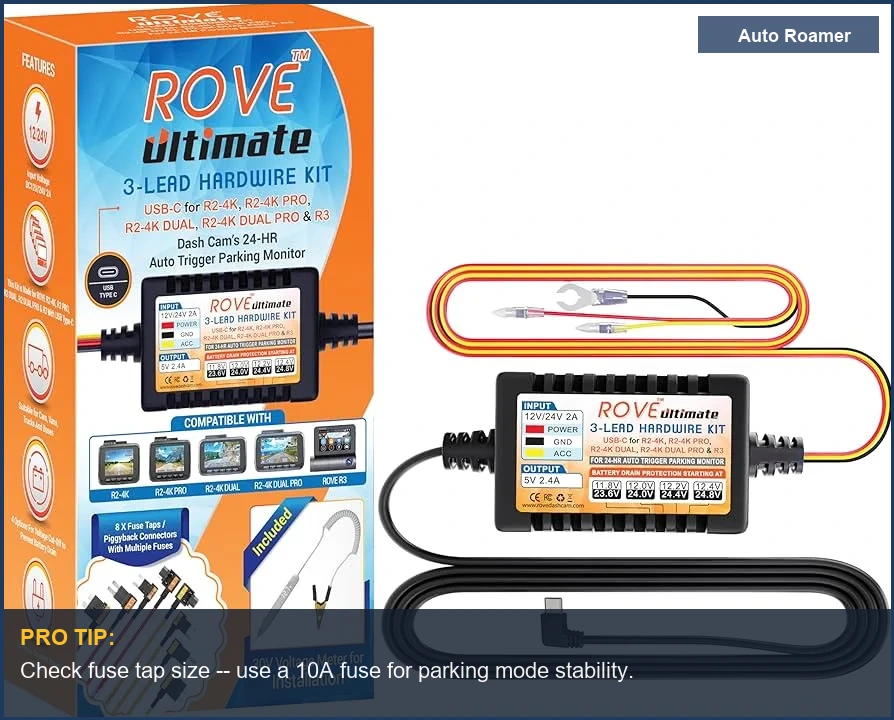
| Low Voltage Detection | Some kits detect voltage drops and switch off. This is critical for preventing thermal runaway in the battery from excessive discharge. The Power Magic Pro has selectable voltage cutoffs. |
| Fuse Tap Compatibility | Your car's fuse box uses specific fuse types: ATM (mini), ATO (regular), or LP-mini. Make sure the kit's fuse taps match. Using the wrong size creates poor contact, leading to increased resistance and localized thermal cycling. |
| Cable Length and Gauge | Sufficient length (10-20ft) for clean routing. Thicker gauge wire (e.g., 18AWG) reduces voltage drop over distance, maintaining circuit integrity. Thin wires heat up, increasing resistance, and potentially melting insulation. |
| USB Output Type (Micro-USB, USB-C) | Matches your dashcam. USB-C is more robust, with better mechanical stress tolerance for repeated connection/disconnection. Micro-USB ports are notorious for pin failure due to shear forces. |
Don't skimp on these. A cheap kit with no voltage cutoff is a dead battery waiting to happen. That's a $180 tow and a $200 battery, minimum.
Our Top Picks
Budget vs Premium Options
You can go cheap or you can go reliable. The difference usually comes down to component quality and parasitic draw. A $15 kit might seem like a steal, until your car won't start on a 20 degree F morning.
| Feature | Budget Options (e.g., generic Amazon kits ~$15-25) | Premium Options (e.g., BlackVue, VIOFO, Thinkware ~$30-60) |
|---|---|---|
| Voltage Cutoff | Often fixed, non-adjustable, or poorly calibrated. May cut off too late (11.5V) or too early (12.5V). This introduces thermal stress on your battery. | Selectable voltage cutoffs (12.0V, 12.2V, 12.5V). More precise, better for battery longevity. Important for protecting your car's starting power. |
| Timer Function | Limited or no timer. Relies solely on voltage, leading to deep discharge if car sits for extended periods. | Adjustable timers (6, 12, 24, 48 hours). Prevents long-term parasitic draw, reducing mechanical stress on battery plates. |
| Cable Quality | Thinner gauge wire (22-24AWG) with cheaper insulation. Higher voltage drop, more prone to thermal cycling and insulation degradation. Connectors can have play. | Thicker gauge (18-20AWG) with robust, heat-resistant insulation. Lower voltage drop, better long-term circuit integrity. Connectors have tighter tolerances. |
| Fuse Taps | Often come with only one type of fuse tap, or flimsy plastic. Poor mechanical bond, potential for arcing. | Includes multiple fuse tap types (ATM, ATO, LP-mini), higher quality plastic and metal contacts. Secure connections, minimal resistance. |
| Reliability | Higher failure-rate, inconsistent performance. Reports of kits failing after a few months. Some claim they 'don't work'. | Lower failure-rate, consistent voltage regulation. Designed for long-term use. Less chance of unexpected battery drain. |
| Cost-per-Fix | Low initial cost, but high potential for dead battery, tow, and replacement costs. | Higher initial cost, but significantly reduces risk of battery issues and associated expenses. Lower overall cost-per-fix. |
I'd rather pay an extra $20 for a kit that reliably works for 5 years than save $15 and buy a new battery every year. That's just basic math.
Setup and Installation Tips
Installing a hardwire kit isn't rocket science, but you need to know what you're doing to avoid frying your car's electrical system or draining your battery. I've seen enough scorched wires to know the importance of correct fuse selection.
- Locate Your Fuse Box. Your car's manual is your bible here. It's usually under the dash, in the engine bay, or in the trunk. You'll need to remove panels, lift tabs, or otherwise dig for it. Don't guess. Guessing leads to blown fuses and dead circuits.
- Identify Fuse Types and Circuits. You need two types of fuses: one that's 'always on' (constant 12V, like for your hazard lights) and one that's 'switched' (ACC, only on when the ignition is on, like your radio). Use a multimeter to confirm. Pull the fuse, probe both sides of the empty slot. One side should be hot. The other side should only be hot when the ignition is on for the ACC circuit.
- Choose Appropriate Fuse Taps. Match the fuse tap to your car's fuse type (ATM, ATO, LP-mini). Insert the original fuse into the tap's lower slot, and a new, lower-amperage fuse (e.g., 5A for the dashcam) into the upper slot. This ensures circuit integrity for both the original device and the dashcam.
- Connect the Wires. The red wire (B+) goes to the 'always on' fuse. The yellow wire (ACC) goes to the 'switched' fuse. The black wire (GND) goes to a chassis ground point - a bare metal bolt on the car's frame. Ensure a solid mechanical bond for the ground; loose grounds cause voltage fluctuations and noise. Secure the wires away from moving parts.
- Test and Route. Before buttoning everything up, test the dashcam in both driving and parking modes. Verify the voltage cutoff works. Then, route the cables neatly along the A-pillar and under the headliner. Use zip ties or cable clips. Don't let cables hang loose; they'll vibrate, causing friction and eventual insulation wear.
This isn't just about making it look clean; it's about minimizing mechanical stress and preventing short circuits.

Care and Maintenance Tips
Once you've hardwired your dashcam, you're not done. It's a system, and like any system, it needs occasional checks to ensure circuit integrity and prevent premature failure. Ignore this, and you'll be troubleshooting a dead battery or a non-recording camera.
- Inspect Cable Routing Annually. Check for chafing or pinching where cables run through panels or around sharp edges. Vibration can cause insulation wear, leading to shorts. This is a common point of mechanical stress. I always check the A-pillar run.
- Verify Voltage Cutoff Function. Every few months, especially if your car sits for extended periods, manually test the voltage cutoff. Let the car sit until the dashcam shuts off, then check your battery voltage with a multimeter. It should be above 12.0V. If it's consistently lower, your cutoff isn't working, or your battery is degrading.
- Check Fuse Tap Connections. Vibration can loosen the fuse taps over time. Give them a gentle tug to ensure they're seated firmly. A loose connection increases resistance, leading to localized heat and potential arcing, which degrades circuit integrity.
- Monitor Battery Health. Your hardwire kit protects against deep discharge, but it doesn't prevent normal battery degradation. A lead-acid battery has a finite number of charge/discharge cycles. If your battery is old, even a perfect hardwire kit won't save it from its eventual thermal cycling death.
- Clean Dashcam Vents. Dust and debris can accumulate in the dashcam's cooling vents, leading to increased operating temperature. This can shorten the lifespan of the internal components and storage media. Overheating accelerates material outgassing and component failure.

