The Quick Taxonomy: Every Type at a Glance
If you have ever stood in an auto-parts aisle staring at a wall of slim plastic strips, the confusing part is not what they do, it is how many ways they get sliced into categories. Car window deflectors, also called vent visors, rain guards, or wind deflectors, all share one job: they let you crack a window for fresh air or to cut cabin humidity while shedding rain and softening wind noise. The differences live in how they attach, how much of the car they cover, what they are made of, and how precisely they fit your specific vehicle. Understanding those four axes turns a bewildering shelf into a short, sane shopping list.
So, what types of car window deflectors are there? The honest answer is that they are grouped along four independent dimensions, plus one specialty category:
- By mounting: tape-on (stick-on, surface-mount) versus in-channel (in-window) deflectors that tuck into the window track.
- By coverage: front-only pairs (two pieces, front doors) versus full sets (four pieces, all four doors).
- By material: acrylic, ABS plastic, or polycarbonate, each with different clarity, tint, and durability.
- By fit: universal trim-to-size versus custom, vehicle-specific molded sets.
- Specialty: sunroof and moonroof wind deflectors, a related but distinct product for the roof opening rather than the side glass.
A single product is described by one choice from each axis. A set might be, for example, in-channel, full four-window, ABS, custom-fit, or at the other end a universal, front-only, acrylic, tape-on pair. Once you see that any listing is just one pick from each of these dimensions, the marketing names stop mattering and the actual product comes into focus. Walk through each dimension below and you will be able to read any listing and know exactly what you are getting. If you are still deciding whether the upgrade is worthwhile at all, it is worth reading whether car window deflectors are worth it first, then coming back here to choose the right kind.
By Mounting: Tape-On vs In-Channel
Mounting is the single most consequential decision, because it shapes the look, the install difficulty, and how the deflector behaves over years of weather. There are two dominant approaches, and the trade-offs between them are clear and consistent.
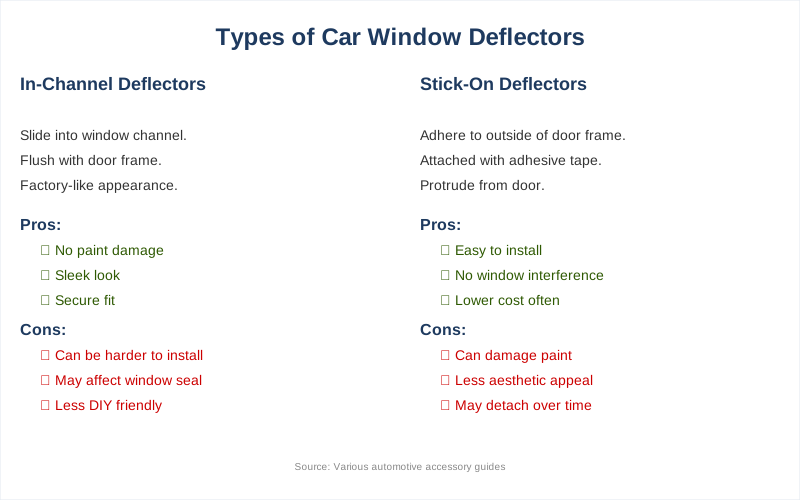
Tape-on (stick-on) deflectors attach to the outside of the door frame, just above the window opening, using a strip of automotive-grade double-sided adhesive. They protrude outward slightly and are the easier of the two to install: clean the surface, peel the backing, line up the piece, and press firmly. The appeal is simplicity and the fact that no part of the deflector goes near the moving glass. The drawbacks are that the adhesive bond depends entirely on good surface prep and a warm install day, the outward profile can catch on car-wash brushes or tight garage openings, and removal can leave stubborn residue that takes adhesive remover and patience to clear. On older or already-compromised paint, aggressive removal can lift a flake of clear coat.
In-channel (in-window) deflectors slide into the rubber channel at the top of the door where the glass seats when rolled up. They sit nearly flush with the door frame, giving a cleaner, closer-to-factory look, and they use no adhesive on your paint at all. The trade-offs run the other way: installation is a touch fussier because the lip must seat correctly without rubbing the rising glass, and a poorly seated piece can squeak or interfere with the window. Because the fit is tighter to the door, in-channel sets are also more likely to be sold as vehicle-specific.
The rule of thumb most installers repeat: choose tape-on for the easiest DIY job and the lowest commitment, and in-channel for the cleanest look and the most secure long-term hold with no adhesive on your paint.
There is also a durability angle that does not show up in product photos. Tape-on deflectors live or die by their adhesive, so they are sensitive to extreme heat-cold cycling, frequent automatic car washes, and the quality of the tape the maker used; a cheap set can start lifting at a corner within a year and then flap and whistle at highway speed. In-channel pieces have no glue to fail, but they rely on the lip staying seated and the surrounding rubber run staying intact, so on a very old vehicle with perished door seals the fit can loosen. Neither failure mode is common with a quality set installed correctly, but knowing which way each style tends to fail helps you inspect a used car that already has them and helps you decide how much to spend.
The mechanics of why both styles quiet the cabin and shed water are covered in more depth in how car window deflectors work; this page stays focused on telling the categories apart so you can match a type to your needs.
In-Window Sub-Types: In-Channel vs Out-of-Channel
Within the broad mounting split, the in-channel family itself has two sub-types that are easy to confuse, and the distinction matters if you want a particular look or a particular install experience.
- True in-channel: the deflector's mounting lip inserts fully into the window's rubber run channel. It sits the most flush and is the most discreet, but it demands the tightest fit, which is why true in-channel sets lean heavily toward custom, vehicle-specific designs.
- Out-of-channel (also called low-profile in-channel or seamless): the piece clips just outside or at the lip of the channel rather than seating deep inside it. It splits the difference: a cleaner profile than a bulky tape-on, but a more forgiving install than a true in-channel because it does not have to thread precisely into the rubber run.
You will also see the term seamless used in marketing, usually to describe a deflector engineered to look continuous and factory-integrated. Seamless is a styling claim more than a separate mounting category, so read the actual attachment description rather than trusting the adjective. If a listing says seamless but the install instructions describe peel-and-stick tape, it is a tape-on product styled to look flush, not an in-channel one.
The practical takeaway: if you want the most invisible result and are willing to buy for your exact vehicle, look for true in-channel. If you want most of that look with an easier install, out-of-channel or low-profile is the friendlier middle ground. Tape-on remains the simplest if appearance is secondary to a fast, low-risk installation.
By Coverage: Front-Only vs Full Set
Coverage is the simplest axis to understand and one of the biggest drivers of price. Deflectors are sold either as front-only pairs or as full sets, and which you need depends entirely on how you use the windows.
- Front-only (two-piece) sets cover just the two front-door windows. They cost less, install faster, and suit drivers who mostly crack the front windows for airflow while driving. For a daily commuter who never opens the rear glass, a front pair is often all that is genuinely useful.
- Full (four-piece) sets cover all four side windows. They cost more and take longer to fit, but they matter if you carry rear passengers who want fresh air, if you crack all the windows to ventilate a hot parked car, or if you want a consistent, symmetric look across the whole vehicle.
There is a quieter reason full sets appeal to people who sleep in their vehicles or ventilate while camping: cracking rear windows for cross-flow without inviting rain is the whole point. If that is your use case, a full set plus good screening is worth considering, and the broader topic of keeping weather out while staying ventilated is covered in pieces like what car window rain guards are. For most ordinary commuting, though, the honest answer is that a front pair delivers the majority of the everyday benefit for a fraction of the cost.
One more coverage nuance trips people up: not every vehicle's rear windows roll all the way down, and some have small fixed quarter-glass panes near the rear doors. On those cars a rear deflector still helps with rain over a partly opened window, but the ventilation payoff is smaller, which is another reason to think about how you actually use each window before buying four pieces out of habit. If you tend to buy full sets for visual symmetry rather than function, that is a perfectly valid reason, just go in knowing you are paying for looks on the rear pair as much as for airflow.
By Material: Acrylic vs ABS vs Polycarbonate
Material determines how a deflector looks, how it ages, and how much abuse it shrugs off. Three materials dominate the market, and the differences are meaningful enough to influence which one you should buy.
Acrylic is the most common material on mainstream deflectors. It offers good optical clarity and takes a smoked tint cleanly, so most of the dark, translucent visors you see are acrylic. It is reasonably durable for the price, but it is more prone to scratching and to yellowing or hazing under years of UV exposure than the tougher plastics. For a budget-friendly set that looks good out of the box, acrylic is the default.
ABS plastic trades some optical clarity for ruggedness. It is typically used for more opaque, body-colored, or matte-finish deflectors and resists impact and flexing better than acrylic. ABS is a common choice for in-channel and custom-molded sets where a solid, structural feel matters more than see-through clarity. It generally holds up better to physical knocks but is not necessarily more UV-stable unless it is treated.
Polycarbonate is the premium option. It is far more impact-resistant than acrylic, more resistant to cracking in cold weather, and the better-made versions carry UV-stabilizing coatings that resist yellowing for longer. It usually costs more, and that price is the trade-off for the longest-lasting clarity and toughness. If you live somewhere with harsh sun or hard winters and you want the set to still look good in five years, polycarbonate is the one to seek out.
Two material notes worth keeping in mind. First, tint level is partly a function of material and partly a separate styling choice, so check both the material and the stated tint darkness, since a very dark front-window deflector can brush against regional tint rules. Second, marketing language is loose; many listings simply say durable plastic, so look for the explicit material name and any mention of UV protection before paying a premium.
Thickness and finish are worth a second look too. Two deflectors made of the same base plastic can feel very different in hand: a thicker, more rigid piece resists flutter and warping in the wind, while a thin, flexible one is cheaper but more likely to vibrate or distort over time. Surface finish matters for aging as well, since a glossy panel shows scratches and hazing more readily than a textured or matte one, and a hard-coat or scratch-resistant layer, where offered, meaningfully slows the dull, scuffed look that cheap sets develop after a few seasons of road grit and brush washes. If a listing photographs beautifully but says nothing about thickness, coating, or material, treat that silence as a hint that it is competing on price rather than longevity.
By Fit: Universal vs Custom Vehicle-Specific
The last major axis is fit, and it interacts strongly with mounting and material. A deflector is either made to fit any car with trimming, or molded for one specific make, model, and year.
- Universal deflectors come as generic strips you cut or bend to approximate your window opening. They are cheap, widely available, and a reasonable fallback for an older or uncommon vehicle that lacks a custom option. The cost is appearance and precision: a trimmed universal piece rarely looks factory, the cut edge can be visible, and a loose approximate fit is more likely to whistle or peel over time. Universal pieces are almost always tape-on, because a cut-to-size strip cannot reliably seat in a window channel.
- Custom (vehicle-specific) deflectors are molded to the exact contour of a named make, model, and year. They drop in with the right curvature, fill the opening cleanly, and look as close to factory as aftermarket gets. They cost more and you must order the correct application, but the payoff is a precise fit, fewer wind-noise and sealing problems, and a far better appearance. True in-channel sets are overwhelmingly sold this way.
The honest guidance is straightforward. If your vehicle is common enough to have a custom option, buy it; the fit and longevity gap over a trimmed universal piece is large and usually worth the modest extra cost. Reserve universal deflectors for the cases where no custom set exists. When you do shop specific sets, a roundup such as the best car window deflectors or the best car window rain guards can shortcut the search to products people have actually had good luck with.
The Specialty Category: Sunroof and Moonroof Visors
One category sits apart from everything above because it does not touch the side glass at all. Sunroof and moonroof wind deflectors mount along the leading edge of the roof opening, above the windshield, to redirect airflow up and over an open sunroof.
Their purpose is specific: with the sunroof tilted or open, fast-moving air hitting the rear edge of the opening creates a deep, throbbing buffeting sound, the helmholtz resonance you feel as a pressure pulse in your ears. A sunroof deflector lifts the air stream so it passes over the gap rather than slamming into its trailing edge, which dramatically cuts that booming noise and lets you actually enjoy an open roof at speed. As a bonus, the raised lip lets you leave the sunroof cracked in light rain for ventilation, the same logic as a side deflector applied to the roof.
Like side deflectors, sunroof visors come in tape-on and clip-in styles and in universal or vehicle-specific fits, and the same trade-offs apply: custom-fit, clip-in versions look cleanest and seat most securely, while universal tape-on versions are cheaper and easier but less tidy. If your main complaint is roof buffeting rather than side-window rain, this is the category you actually want, and it is easy to overlook because it lives next to the side-window products despite solving a different problem.
A couple of fit cautions are specific to this category. Panoramic and full-length sunroofs have a different leading-edge geometry than a small pop-up roof, so a deflector sized for a compact opening may not span a large one correctly; match the deflector to your actual roof type, not just to the make. And because these mount at the very front of the roof in the airflow path, a loose or undersized one can buzz or, worse, work free at speed, so a secure, correctly sized fit matters even more here than on the doors. Used well, though, a sunroof deflector is the cheapest way to make an open roof genuinely pleasant on the highway instead of an exercise in ear pressure.
How to Pick the Right Type for Your Car
With the categories laid out, choosing is a matter of walking the same four axes in order and letting your priorities resolve each one. Here is a clean way to decide.
- Start with fit. Check whether a custom, vehicle-specific set exists for your make, model, and year. If it does, strongly prefer it; fit drives both appearance and how few problems you will have later. Only fall back to universal if nothing custom is available.
- Then choose mounting. If you want the cleanest, most factory-like look and no adhesive on your paint, go in-channel, accepting a slightly fussier install. If you want the simplest, lowest-risk installation and do not mind a small outward profile, choose tape-on. Out-of-channel is the sensible middle.
- Pick coverage by use. Front-only if you mostly crack the front windows; a full set if rear passengers, parked-car ventilation, or symmetry matter to you.
- Choose material by climate and budget. Acrylic for an affordable, good-looking default; ABS for a rugged, more opaque or body-colored look; polycarbonate when harsh sun or cold and long-term durability justify the premium.
A few fitment cautions before you buy. Confirm the application matches your exact trim and body style, since two-door and four-door or sedan and wagon variants of the same model often need different sets. Watch tint darkness against local rules for front side windows. For tape-on sets, plan to install on a warm, dry day and leave the car unwashed for a day or two so the adhesive cures. For in-channel sets, seat the lip fully and roll the window up and down a few times to confirm it does not rub or bind.
Do that, and the wall of plastic strips stops being intimidating. You will know whether you want, say, a custom in-channel acrylic front pair or a universal tape-on full set, and you will be reading listings instead of guessing. If you are still weighing the whole idea, circle back to whether deflectors are worth it; otherwise, you are ready to shop the type that genuinely fits how you drive.